How to Check Online Users in Laravel 9 Application Step by Step with Example [Full Tutorial]
Author: Syed Arshad Sultan
Hi Developers,
In this Laravel 9 tutorial, we will discuss how to check online users in the Laravel 9 application with an example, I assume users already understand Laravel basics like creating the new Laravel Project, database configuration, creating models, controllers, migrations, etc.
Get started with this tutorial, dear developers if you want to check current online & offline users in the Laravel application, It is easy and simple to get the last seen and online or offline display list of the user.
Here I will give you a full example to check a user’s online status and store last seen in Laravel app. So let’s follow the bellow step by step.
Step 1: Install Laravel App
In this step, You can create Laravel 9 new project. So open the terminal and write the command.
composer create-project --prefer-dist laravel/laravel blogAfter successfully creating the Laravel 9 project, run the following command to verify everything is fine & not, if you see a blow image then is fine.
php artisan serve Step 2: Setup Database Configuration
Open “.env” file and change the database name, username and password in the env file.
 DB_CONNECTION=mysql
 DB_HOST=127.0.0.1
 DB_PORT=3306
 DB_DATABASE=Enter_Your_Database_Name
 DB_USERNAME=Enter_Your_Database_Username
 DB_PASSWORD=Enter_Your_Database_Password
Step 3: Add New Column to Users Table
In this step, we will create new migration for adding “last_seen” column:
php artisan make:migration add_last_seen_to_users_table --table=users database/migrations/2022_12_12_03235_add_new_column_last_seen.php
<?php

 use Illuminate\Database\Migrations\Migration;
 use Illuminate\Database\Schema\Blueprint;
 use Illuminate\Support\Facades\Schema;

 class AddNewColumnLastSeen extends Migration
 {
    /**
     * Run the migrations.
     *
     * @return void
     */
    public function up()
    {
        Schema::table('users', function(Blueprint $table){
            $table->timestamp('last_seen')->nullable();
        });
    }

    /**
     * Reverse the migrations.
     *
     * @return void
     */
    public function down()
    {

    }
 }
Run migration command:
php artisan migrate Add last_seen column on User model as like below:
app/Models/User.php
 <?php

 namespace App\Models;

 use Illuminate\Contracts\Auth\MustVerifyEmail;
 use Illuminate\Database\Eloquent\Factories\HasFactory;
 use Illuminate\Foundation\Auth\User as Authenticatable;
 use Illuminate\Notifications\Notifiable;

 class User extends Authenticatable
 {
    use HasFactory, Notifiable;

    /**
     * The attributes that are mass assignable.
     *
     * @var array
     */

    protected $fillable = [
        'name', 'email', 'password', 'last_seen'
    ];

    /**
     * The attributes that should be hidden for arrays.
     *
     * @var array
     */

    protected $hidden = [
        'password', 'remember_token',
    ];

    /**
     * The attributes that should be cast to native types.
     *
     * @var array
     */

    protected $casts = [
        'email_verified_at' => 'datetime',
    ];
 }
Step 4: Generate Auth Scaffolding
Use Laravel UI for generating auth scaffolding, so let’s run the below command:
composer require laravel/ui --dev after installing composer package, run bellow command:
php artisan ui bootstrap --auth now, run npm install commands:
npm i && npm run dev Step 5: Create Middleware
Create UserActivity for an update last seen time and add online status, let’s run the bellow command:
php artisan make:middleware UserActivity Update middleware code as below:
app/Http/Middleware/UserActivity.php
 <?php

 namespace App\Http\Middleware;

  use Closure;
  use Illuminate\Http\Request;
  use Auth;
  use Cache;
  use App\Models\User;

    class UserActivity
    {

        /**
         * Handle an incoming request.
         *
         * @param  \Illuminate\Http\Request  $request
         * @param  \Closure  $next
         * @return mixed
         */

        public function handle(Request $request, Closure $next)
        {
            if (Auth::check()) {
                $expiresAt = now()->addMinutes(2); /* keep online for 2 min */
                Cache::put('user-is-online-' . Auth::user()->id, true, $expiresAt);

                /* last seen */
                User::where('id', Auth::user()->id)->update(['last_seen' => now()]);
            }

            return $next($request);
        }
    }
Register, this middleware to kernel file:
 <?php

    namespace App\Http;

    use Illuminate\Foundation\Http\Kernel as HttpKernel;

    class Kernel extends HttpKernel
    {
        ...........
        protected $middlewareGroups = [
            'web' => [
                \App\Http\Middleware\EncryptCookies::class,
                \Illuminate\Cookie\Middleware\AddQueuedCookiesToResponse::class,
                \Illuminate\Session\Middleware\StartSession::class,
                \Illuminate\View\Middleware\ShareErrorsFromSession::class,
                \App\Http\Middleware\VerifyCsrfToken::class,
                \Illuminate\Routing\Middleware\SubstituteBindings::class,
                \App\Http\Middleware\RestrictIpAddressMiddleware::class,
                \App\Http\Middleware\UserActivity::class,
            ],

            'api' => [
                'throttle:api',
                \Illuminate\Routing\Middleware\SubstituteBindings::class,
            ],
        ];
        ...........
    }
Step 6: Create Route
Create some routes for display online users function.
routes/web.php
 <?php

    use Illuminate\Support\Facades\Route;

    use App\Http\Controllers\UserController;

    /*
    |--------------------------------------------------------------------------
    | Web Routes
    |--------------------------------------------------------------------------
    |
    | Here is where you can register web routes for your application. These
    | routes are loaded by the RouteServiceProvider within a group which
    | contains the "web" middleware group. Now create something great!
    |
    */

    Route::get('/', function () {
        return view('welcome');
    });

    Auth::routes();

Route::get('/home', [App\Http\Controllers\HomeController::class, 'index'])->name('home');

Route::get('online-user', [UserController::class, 'index']);
Step 7: Create Controller
Create UserController and add the following code to that file:
app/Http/Controllers/UserController.php
 <?php

 namespace App\Http\Controllers;

 use Illuminate\Http\Request;
 use App\Models\User;

 class UserController extends Controller
 {
    /**
     * Display a listing of the resource.
     *
     * @return \Illuminate\Http\Response
     */
    public function index(Request $request)
    {
        $users = User::select("*")
                        ->whereNotNull('last_seen')
                        ->orderBy('last_seen', 'DESC')
                        ->paginate(10);

        return view('users', compact('users'));
    }
 }
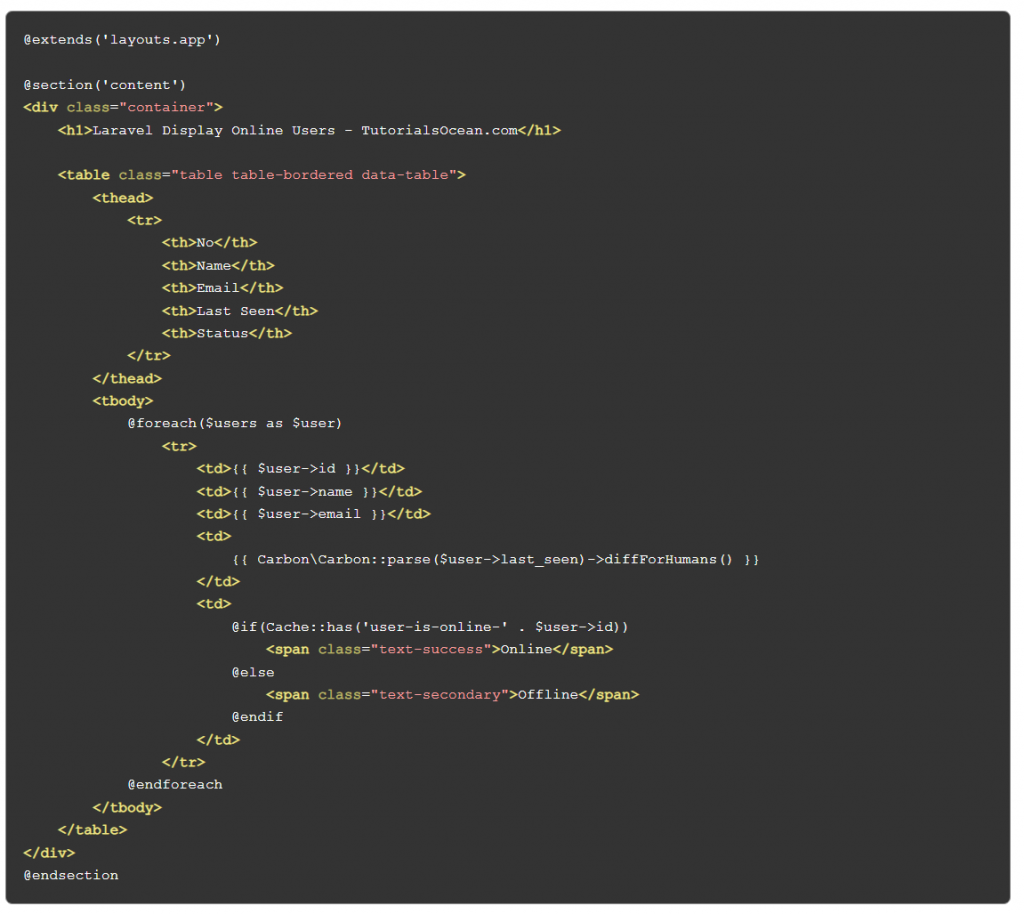
Step 7: Create Blade Files
Create blade files for users. so let’s create one by one file:
resources/views/users.blade.php
Run the below command to run Laravel Application:
php artisan serve Thank you for reading this article.